Staff Details - Working Days Tab

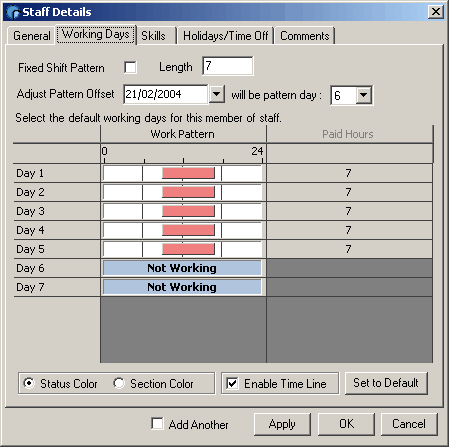
This tab is used to view and maintain the work pattern for the employee. When you first create a member of staff, they will have the default pattern definined for their Employment Category. The screenshot above shows a new staff member with the basic full time employment category pattern of mon-fri 9-5, with 7 hours pay per day.
Note: The Paid hours here come from the Day Templates, not the default paid hours from the Employment Category.
If you want to manually specify the pattern for the employee, you would just change the contents of the work pattern for each day as required. Changing the actual contents of the time line for a day is covered elsewhere.
Pattern Length
The Length of the pattern can be updated by changing the Length value. In the example above it is the default, 7 days. Using a multiple of 7 for the pattern is sensible, as it allows for more predictable results, but it is not compulsory. For example, you can easily produce a 3 day on, 2 day off pattern by setting the Length to 5.
Adjusting the Pattern Offset
Adjusting the Pattern Offset allows you to control the position within the pattern of the employee. For example, in the default 7 day mon-fri 9-5 pattern, the only important factor when specifying the offset is that Day 1 always falls on a monday. To ensure this, you would select the date of any Monday in the Adjust Pattern Offset date box, and select 1 from the pattern day drop-down box.
Note: By Default, your patterns will always start on a monday, unless you change it. However, in patterns longer than 7 days, it is not guarunteed which monday, and in patterns that are not a direct multiple of 7, the regularity of Day 1 falling on a monday will vary dramatically.
Adjusting the Offset becomes more important when the pattern length is not 7, but the principle is the same. Either:-
- Select the date you want to be pattern Day 1 from the Adjust Pattern Offset date box (For Example, if you want next monday to be pattern day 1, select the date of next monday from the list). Then select 1 from the pattern day drop down box.
Or...
- Calculate what day you want the date shown in the Adjust Pattern Offset date box to be, and select that day number from the pattern day drop down box.
Note : It is important to remember that the work pattern is a constant recurring pattern. It is effective immediately and setting the date of day 1 does not control a fixed absolute date when the pattern begins, it only specifies one of many Day 1's within a constant recurring pattern.
If you want a pattern to change on a given date, you can do this by creating rota's beyond this date before making the change, and then when the template update screen is shown, select that date as the date when the template updates should be applied. However, any existing rota's may be updated to the new pattern by another user, or by using the Reset option in the main rota screens, so care must be taken if you want to maintain an existing pattern.
Fixed Shift Patterns
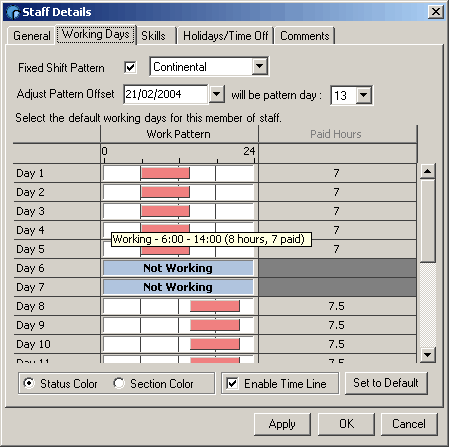
The Fixed Shift Pattern check box allows you to specify that this employee will use one of your pre-defined shift patterns. The screen shot below shows an employee on a Continental shift pattern, a three week (21 day) rotation with one week at 6am-2pm, one week at 2pm-10pm and finally a week at 10pm-6am.

As with a manual pattern, you can adjust the pattern offset (see instructions above), and make custom changes to the work pattern for this employee as normal (see instructions for interacting with timelines).
Note: Normally, any changes made to the pattern for a specific employee will be overwritten if the shift pattern is updated. However, if you plan to make a large number of changes to an employee, you can break the link with the shift pattern by unchecking the fixed shift pattern check box. The pattern changes you make will then be preserved, however, none of the changes made to a shift pattern will be applied to the employee.
Set To Default
This button will reset the work pattern for an employee to that of the selected fixed shift pattern. If no shift pattern has been selected, the pattern will revert to that specified in the employment category.
Status Color/Section Color
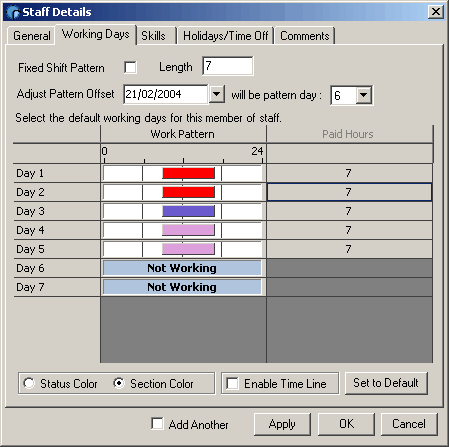
If you have specified the section for any or all of the employees working time items, changing the view to Section Color can be useful, here any item where the employee has been allocated will be shown in the color of that section. Un-allocated, and non-working items (breaks etc) will be a dark grey color (dependent on windows version and configuration). Below you can see an employee working three different sections :-

Enable Time Line
If the Enable Time Line check box is checked, clicking the left mouse button in the time line area will adjust the time items as normal. If unchecked, then the left mouse button can be used to select multiple time lines to work on as one. This is covered in more depth in Interacting with a time line.


