


Interacting with time lines
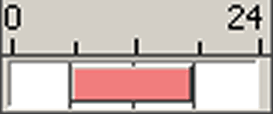
The screen above shows a standard time line. Interation can be either directly, using the left mouse button to click and drag to make changes, or set via options in the right mouse button menu.
For interaction using the left mouse buttons, the time lines must be enabled on that form. This will usually be done via a check box, tool bar button or menu option. It may default to enabled, depending on which area of the system you are updating.
To clarify terms in this documentation, time line will be used to refer to a whole time line area, and time item will be used to refer to an item on the time line, such as the red rectangular object shown in the screenshot above.
The time line shown above represents one whole day for one member of staff. The system in this case is configured to show the entire 24 hour period, which can be changed to show a selected time window, which may make the time line more useful if the site never works late at night or early in the morning. This is done via the preferences option on the main menu.
A whole day for a member of staff could also be represented by a single status, such as Not Working, Holiday, Training etc. As shown below:
For further instructions:
When Enable Timeline is not selected, clicking and dragging the left mouse button will select multiple time lines. Once selected, you can manipulate multiple time lines as one using the right mouse button menu.
